I get so many questions each week about my photography, so I thought I would try and fit a bit of everything into one post......a little crash course. I am so lucky to be able to do what I love, and hope I can share some good basic information with you!
Equipment:
I shoot with the Canon 5d Mark II. My favorite lens right now is the 35 mm f 1.4. I LOVE my setup! But I also shoot several weddings and portrait sessions each year--so this camera is perfect for me. There are some amazing (and more affordable!) choices out there for every different level.
I highly recommend the Canon XTi. It is such a good little camera, and a great way to explore the world of DSLRs. It's an older model, which makes it very affordable if you are in the market for a good beginner camera.
The next upgrade would be the newer rebel, the T2i. A great camera + it shoots HD video! I LOVE having my camera and video all in one!
I say start with a more affordable camera, and work on getting nicer lenses. If you are new to DSLR cameras, you will love the kit lens that your camera comes with. When you are ready to branch out a bit more, I think the Canon 50mm 1.8 is a great little lens, with an awesome $80 pricetag!
Processing:
I use Lightroom and Photoshop CS3. I am NOT a photoshop whiz by any means....I just like a little tweak here and there. I think my best advice for processing would just be to STOP! really. There is such a thing as too much, and I think it's so important not to get too caught up in processing fads (over-saturation, crazy sharpened eyes, fake plastic skin....and on and on).
Actions:
I do use actions....kinda. Over the years I've played around with various free actions I've found--and sets I've purchased. I've loved a few of them, but found a good portion of them that I've never used. I'm now down to a small handful that I use just to speed up my work flow....and they are actions I've created on my own! I'm going to show you how to make a very simple action!
When shooting children (does that sound right?):
Let kids be themselves. Ask them how they want their picture taken. Have them make silly faces for you. Make sure you're both having fun! If you need a good giggle, just say "who tooted!?".....it works like a charm!! (on some adults too:)
This picture was shot in late morning, in open shade. ISO 200, 35mm, f/1.4, 1/1000 sec. I shoot in RAW, which leaves my images a bit on the dull side--it just needs a little pop.....so let's make an action!
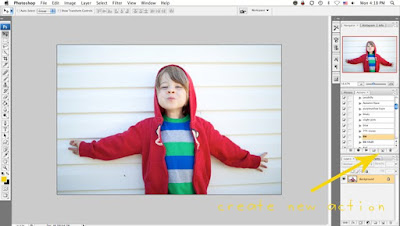
On the right-hand side, in your action window, at the bottom you'll see a little post-it-note looking button. This will start recording your new action. Click it, and name your action (I just named it "My Action" for this tutorial, because I am creative like that)
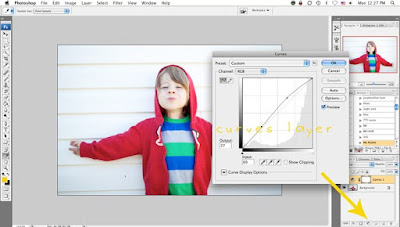
To brighten the brights, and darken the darks, we're going to give it just a teeny little "S" shaped curve layer. (layers button, curves) Curves is a powerful tool--play around with it a lot to get different results.
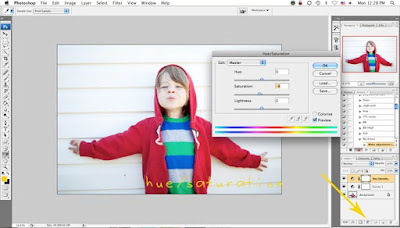
Color varies from camera to camera, and for my my camera's color is just a little too saturated for my liking . I create a new hue/saturation layer, and take down the saturation just a bit.
That's it! My photo is done! Push the "stop" button at the bottom of the actions window to stop recording. Flatten the layers of your image (layer, flatten image). Open up another image, and test out your new action by pressing the "play" button.
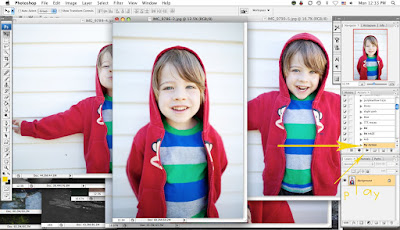
You can create actions for small tweaks, black and whites, or resizing your images!
And just keep practicing. Take pictures of EVERYTHING. Try out what I did for yesterdays post--look around for the pretty things in your day-to-day life, and photograph them. Have fun!
--
sheena

Equipment:
I shoot with the Canon 5d Mark II. My favorite lens right now is the 35 mm f 1.4. I LOVE my setup! But I also shoot several weddings and portrait sessions each year--so this camera is perfect for me. There are some amazing (and more affordable!) choices out there for every different level.
I highly recommend the Canon XTi. It is such a good little camera, and a great way to explore the world of DSLRs. It's an older model, which makes it very affordable if you are in the market for a good beginner camera.
The next upgrade would be the newer rebel, the T2i. A great camera + it shoots HD video! I LOVE having my camera and video all in one!
I say start with a more affordable camera, and work on getting nicer lenses. If you are new to DSLR cameras, you will love the kit lens that your camera comes with. When you are ready to branch out a bit more, I think the Canon 50mm 1.8 is a great little lens, with an awesome $80 pricetag!
Processing:
I use Lightroom and Photoshop CS3. I am NOT a photoshop whiz by any means....I just like a little tweak here and there. I think my best advice for processing would just be to STOP! really. There is such a thing as too much, and I think it's so important not to get too caught up in processing fads (over-saturation, crazy sharpened eyes, fake plastic skin....and on and on).
Actions:
I do use actions....kinda. Over the years I've played around with various free actions I've found--and sets I've purchased. I've loved a few of them, but found a good portion of them that I've never used. I'm now down to a small handful that I use just to speed up my work flow....and they are actions I've created on my own! I'm going to show you how to make a very simple action!
When shooting children (does that sound right?):
Let kids be themselves. Ask them how they want their picture taken. Have them make silly faces for you. Make sure you're both having fun! If you need a good giggle, just say "who tooted!?".....it works like a charm!! (on some adults too:)
This picture was shot in late morning, in open shade. ISO 200, 35mm, f/1.4, 1/1000 sec. I shoot in RAW, which leaves my images a bit on the dull side--it just needs a little pop.....so let's make an action!
On the right-hand side, in your action window, at the bottom you'll see a little post-it-note looking button. This will start recording your new action. Click it, and name your action (I just named it "My Action" for this tutorial, because I am creative like that)

To brighten the brights, and darken the darks, we're going to give it just a teeny little "S" shaped curve layer. (layers button, curves) Curves is a powerful tool--play around with it a lot to get different results.

Color varies from camera to camera, and for my my camera's color is just a little too saturated for my liking . I create a new hue/saturation layer, and take down the saturation just a bit.

That's it! My photo is done! Push the "stop" button at the bottom of the actions window to stop recording. Flatten the layers of your image (layer, flatten image). Open up another image, and test out your new action by pressing the "play" button.

You can create actions for small tweaks, black and whites, or resizing your images!
And just keep practicing. Take pictures of EVERYTHING. Try out what I did for yesterdays post--look around for the pretty things in your day-to-day life, and photograph them. Have fun!
--
sheena

No comments:
Post a Comment